OFweek Smart Home Network News The rapid development of the domestic smart home industry, overseas companies in advance to seize the Chinese market, third-party smart home control and application platform become popular. Recently, Apple and R & F Group set up a model of smart home in Beijing, causing a lot of attention, this time the smart home model room is mainly controlled by homekit platform for smart appliances, for friends who are also rice flour and fruit powder In fact, I would very much like to know how to implement the homekit platform for Xiaomi Siri Voice. For this purpose, Xiao Bian specifically collected some homekit platform methods for implementing Xiaomi Siri Voice via Mac. The following is a detailed introduction for everyone.

First need to install ha and hb platforms
What are ha and hb? The Homeassistant(ha) platform is an open source community. The reason why Xiaomi can intervene in the homekit is because the platform it joins breaks the hardware barrier and has excellent compatibility. Homebridge (hb) platform is mainly to achieve common hardware products to join the honekit platform to implement the siri function.
Step one: Install ha on Mac first
1, first install python (Baidu python official website to download the current stable version 3.6)
2, open the terminal input
Sudo pip3 install homeassistant
3, pop-up prompt box click not now
4, hass --open-ui
5, set the display hidden file, find the configuration. Yaml file for data configuration.
Step 2: Install hb again in Mac environment
1, install XCODE must search and download in the appstore, the file is relatively large.
2. Install nodejs (https://nodejs.org/en/download/)
3, install homebridge
Sudo npm -g install homebridge
4, install the homebridge-homeassistant plug-in
Sudo npm install -g homebridge-homeassistant
5 Run a homebridge once
Homebridge
Then the keyboard input Ctrl+C to stop the homebridge operation, the command prompt will appear again
6 Creating and Editing Homebridge Configuration Files
Cd /Users/your username/. Homebridge
Sudo nano config. Json
Right-click the ############
{
"bridge": {
"name": "Homebridge",
"username": "6D:19:E0:E7:83:62",
"port": 51826,
"pin": "123-45-678"
},
"platforms": [
{
"platform": "HomeAssistant",
"name": "HomeAssistant",
"host": "http://192.168.123.28:8123",
"password": "raspberry",
"supported_types": ["fan", "garage_door", "input_boolean", "light", "lock", "media_player", "rollershutter", "scene", "switch"]
}
]
}
After pasting, press Ctrl+X on the keyboard, enter Y, save and exit
"username": "CC:22:3D:E3:CE:30", ###This MAC address can be changed to your computer's MAC address ###MAC must be capitalized
"host": "http://192.168.1.200:8123", where 192.168.1.200 is the LAN IP address of your computer####
7 Run homebridge, enter homebridge in the terminal, keep running, open the Apple mobile home app, add homebridge, enter the pin code, added successfully.
Add millet gateway
1. Open https://github. Com/lazcad/homeassistant, download the file
2, in the file. Homeassistant Create a folder custom_components below and copy the downloaded file to the custom_components directory.
3, get millet gateway sid and key
Open the Mijia app, find the gateway interface, open the upper right corner "..." Click "About", in the air shot area clicked 5 times, open the LAN communication protocol button. Get the key and record it. Open the gateway information and record the sid.
4, open the configuration with software textwrangler. Yaml, start adding millet gateway information.
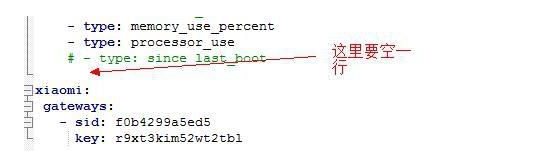
In configuration. The yaml document finally adds the millet gateway information, and is strictly aligned with the format. The sid and the key are followed by one grid. The contents of the sid and key are lowercase letters and numbers, and there is no colon.
Copy the contents and modify the contents of sid and key
Xiaomi:
Gateways:
- sid: f0b4299a5ed5
Key: r9xt3kim52wt2tbl
Save after modification.
5, restart the homeassistant, modify the configuration each time. The yaml data must restart the homeassistant so that the data can take effect.
6, install the homebridge-aqara plug-in terminal
Sudo npm install -g homebridge-aqara
7, edit config. Json, add the following data
{
"platform": "AqaraPlatform",
"sid": ["6409802da3b3"],
"password": ["02i44k56zrgg578b"]
}
At last
Place the homeassistant and homebridge executor in the dock and click directly to run. To run ha first, run hb again. According to the directory: Resource Library - framworks-python. Framwork-versions-3.6-bin-hass, find hass directly drag to the dock.
The homekit platform method for how to implement millet siri voice via Mac is introduced here first, followed by Xiaobian will collect more related dry goods related to homekit application.
The utility model relates to a medical atomization treatment and humidifying device belonging to the technical field of medical equipment and household appliances.
Professional Medical Atomization manufacturer is located in China, including Medical Vape,Dose Control Vape Pen,Supersonic Wave Vape, etc.
Medical Atomization,Medical Vape,Dose Control Vape Pen,Supersonic Wave Vape
Shenzhen MASON VAP Technology Co., Ltd. , https://www.e-cigarettefactory.com